Category Archives: Programming

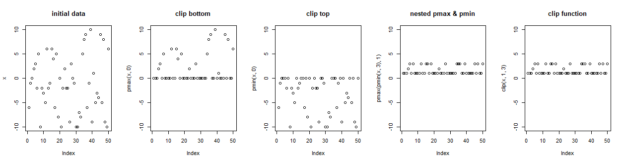
Equivalent of Numpy’s Clip function in R

Numpy’s clip function is a handy function that brings all data in a series into a range. For example, in machine learning, it is common to have activation functions that take a continuous range of values and bring them to a range like 0 to 1, or -1 to 1.

In my case, I was working on some quality control charts that have control limits. In this case, control limits could be calculated to be below 0, but should never be. I was working in R. R has a function max() that can take two values and return the max. So by applying that function over a series, you make make sure each value was at least 0. But it felt a bit cumbersome compared to clip. min() and max() are not vectorized in R. That makes sense, because you may want the max or min of the entire series, so it makes sense that you can pass a series or many values, and get a single answer.

Note that in my use case, the second value is a scalar. But it could be a vector of the same size.

I discovered the pmin and pmax functions which can clip a single bound, or be combined to approximate the clip function. Here’s a gist showing plots of how this works:

To see the plotted output, click here.

Files and Pipes in R Video Demo

I’ve worked with various alternate file handlers in python before and wanted to explore the options in R. I was pleasantly surprised to find handlers prebuilt for tasks like compressing data. In addition, a pipe function is available to allow you to use less common commands on your file, like gpg for encryption.

I put together a quick video demo of how to use these functions, and it’s available on youtube:

If you are having a hard time reading the text, click here to view the video directly on youtube.

Comment here or on the video with any feedback or questions.

Installing pymc on OS X using homebrew

I’ve been working through the following book on Bayesian methods with an emphasis on the pymc library:

However, pymc installation on OS X can be a bit of a pain. The issues comes down to fortran… I know. The version of gfortran in newer gcc implementations doesn’t work well with the pymc build, you need gfortran 4.2, as provided orignally by apple. Homebrew has a package for this.

I dealt with this before, but had problems again after upgrading to Sierra. So this time, I thought I’d document the steps so I don’t have this problem again. Let me know if there are any steps that you feel need added as you try this.

Installing TensorFlow on CentOS

Google released TensorFlow as open source for community use and improvement. From the site: “TensorFlowâ„¢ is an open source software library for numerical computation using data flow graphs.”

The instructions on tensorflow.org are aimed at Ubuntu and OS X. I had a need to install it on CentOS so I documented the steps in a github gist. Feel free to comment if you find something I missed:

* Updated 8/18/2016 for TensorFlow 0.10
* Updated gist 10/18/2016 to correct typo in epel-release

Running a Local ElasticSearch Cluster for Development

ElasticSearch is a document database built on Lucene, a full text-search engine. It clusters and is useful in a variety of scenarios. If you want to run it locally and test some of the clustering feature, here are some things I learned from my experience.

Install with your preferred package manager, or from source. In my case I use homebrew, so install is as easy as:

brew install elasticsearch

You can run multiple nodes from one install. First, you will want to tweak the config. For me, the elasticsearch.yml config file was located in /usr/local/Cellar/elasticsearch/1.4.0/config/, but that may vary based on your OS, package manager, or version.

Mainly, I set a value for cluster. name:

cluster.name: some_cluster_name_of_your_choosing
marvel.agent.enabled: false

By default, elasticsearch joins any cluster with the same name, so you do not want to run on the default or you will be syncing with other local developers on your network.

Then you want to configure your startup mechanism. For some users, that would mean configuring the elasticsearch file in /etc/init.d, but for OS X homebrew users, my startup file is ~/Library/LaunchAgents/homebrew.mxcl.elasticsearch.plist. First, setup extra nodes. In OS X, that means making copies of the LaunchAgent file in the same directory with unique names. It’s worth noting if you’re using homebrew, that the original LaunchAgent plist file is a symlink and you’ll want to copy the contents to a new file. I numbered my extra nodes, so the filenames were homebrew.mxcl.elasticsearch2.plist, and so on. I altered the plist file to have a couple of extra arguments, specified in the ProgramArguments node. I removed the xml nodes that specify keeping the worker alive. The results were:

I set custom node names and ports via the plist file. Note that on a Linux based machine, you would later the service to run multiple ElasticSearch nodes with those custom parameters.

Finally, since I didn’t want to run those scripts individually each time, I create a script to launch all nodes at once. Note that you’ll want to add execute permissions and put it somewhere in your path.

Finally, I recommend installing Marvel, particulary for Sense, a nice tool for running commands on ElasticSearch. You can install Marvel with this command in the ElasticSearch root directory (for me, /usr/local/Cellar/elasticsearch/1.4.0/):

bin/plugin -i elasticsearch/marvel/latest

Now you can bring the cluster up with es_cluster

Enjoy!