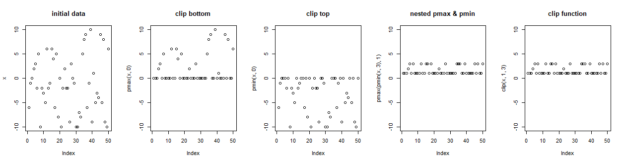
Equivalent of Numpy’s Clip function in R

Numpy’s clip function is a handy function that brings all data in a series into a range. For example, in machine learning, it is common to have activation functions that take a continuous range of values and bring them to a range like 0 to 1, or -1 to 1.

In my case, I was working on some quality control charts that have control limits. In this case, control limits could be calculated to be below 0, but should never be. I was working in R. R has a function max() that can take two values and return the max. So by applying that function over a series, you make make sure each value was at least 0. But it felt a bit cumbersome compared to clip. min() and max() are not vectorized in R. That makes sense, because you may want the max or min of the entire series, so it makes sense that you can pass a series or many values, and get a single answer.

Note that in my use case, the second value is a scalar. But it could be a vector of the same size.

I discovered the pmin and pmax functions which can clip a single bound, or be combined to approximate the clip function. Here’s a gist showing plots of how this works:

To see the plotted output, click here.

Using Tensorboard with Multiple Model Runs

I tend to use Keras when doing deep learning, with tensorflow as the back-end. This allows use of tensorboard, a web interface that will chart loss and other metrics by training iteration, as well as visualize the computation graph. I noticed tensorboard has an area of the interface for showing different runs, but wasn’t able to see the different runs. Turns out I was using it incorrectly. I used the same directory for all runs, but to use it correctly you should use a subdirectory per run. Here’s how I set it up to work for me:

First, I needed a unique name for each run. I already had a function that I used for naming logs that captures the start time of the run when initialized. Here’s that code:

Then, I used that to create a constant for the tensorboard log directory:

Finally, I run tensorboard on the parent directory, without the unique run name:

If you’re wondering why I pass the host parameter to explicitly be all hosts, this is so that it works when running on a cloud GPU server.

You’ll now see each subdirectory as a unique run in the interface:

Multiple runs in tensorboard

Multiple runs in tensorboard

That should do it. Comment if you have questions or feedback.

StirTrek 2018 Talk: Machine Learning in R

I had the chance to speak at StirTrek 2018 about Machine Learning in R. I have been to StirTrek before, but it’s been a few years. The conference has really grown, as there are over 2000 attendees now.

I was in the 3:30 timeslot. I talked in a full theater and they broadcast the talk to two other theaters. I don’t know what attendance was like in the overflow rooms. Most of the follow up questions were from developers looking for resources to get started, tutorials, etc. It seemed like a sign that attendees were interested in going further, which was the point of the talk.

Start of the Talk Agenda

The organizers did a great job. I had a helpful proctor who notified about time, and made sure I was setup and informed.

Regression as an intro to modeling

The talk will go up later this month on YouTube, and I’ll add it to the blog. Thanks to all who attended, and a big thanks to all who helped organize, sponsor, and volunteered for the conference.

Hadoop: Accessing Google Cloud Storage

First, go here to choose the hadoop google cloud storage connector for your version of hadoop, likely hadoop 2.

Copy that file to $HADOOP_HOME/share/hadoop/tools/lib/. If you followed the instruction in the prior post, that directory is already in your class path. If not, add the following to your hadoop-env.sh file (found in $HADOOP_CONF directory):

#GS / AWS S3 Support
export HADOOP_CLASSPATH=$HADOOP_CLASSPATH:$HADOOP_HOME/share/hadoop/tools/lib/*

Create a service account in google cloud that has the necessary Storage permissions. Download the credentials and save somewhere, in my case I renamed the file and saved it in .config/gcloud/hadoop.json.

Add the following properties in your core-site.xml:
<configuration>
<property>
<name>fs.gs.project.id</name>
<value>someproject-123</value>
<description>
Required. Google Cloud Project ID with access to configured GCS buckets.
</description>
</property>

<property>
<name>google.cloud.auth.service.account.enable</name>
<value>true</value>
<description>
Whether to use a service account for GCS authorizaiton.
</description>
</property>

<property>
<name>google.cloud.auth.service.account.json.keyfile</name>
<value>/Users/tim/.config/gcloud/hadoop.json</value>
</property>

<property>
<name>fs.gs.impl</name>
<value>com.google.cloud.hadoop.fs.gcs.GoogleHadoopFileSystem</value>
<description>The implementation class of the GS Filesystem</description>
</property>

<property>
<name>fs.AbstractFileSystem.gs.impl</name>
<value>com.google.cloud.hadoop.fs.gcs.GoogleHadoopFS</value>
<description>The implementation class of the GS AbstractFileSystem.</description>
</property>

</configuration>

Note to change someproject-123 to your actual project-id, which can be found in the google cloud dashboard.

Now test this setup with:

hdfs dfs -ls gs://somebucket

Of course you’ll need to replace somebucket with an actual bucket/directory in your google storage account.

Now you should be setup to use S3 and Google storage with your local hadoop setup.

Hadoop: Accessing S3

This post follows in a series of doing local hadoop setup on macOS for development / learning purposes. In the first post, we installed hadoop.

If you get stuck or need more detail, feel free to check out the apache docs on S3 support.

First, we have to add the directory with the necessary jar files to the Hadoop classpath. In hadoop-env.sh (which is in the $HADOOP_CONF directory), add the following lines to the end of the file:

#AWS S3 Support
export HADOOP_CLASSPATH=$HADOOP_CLASSPATH:$HADOOP_HOME/share/hadoop/tools/lib/*

Make sure you have the following properties set in your core-site.xml file (which is in the $HADOOP_CONF directory).

<configuration>

<property>
<name>fs.s3a.access.key</name>
<value>KEY_HERE</value>
<description>AWS access key ID.
Omit for IAM role-based or provider-based authentication.</description>
</property>

<property>
<name>fs.s3a.secret.key</name>
<value>SECRET_KEY_HERE</value>
<description>AWS secret key.
Omit for IAM role-based or provider-based authentication.</description>
</property>

<property>
<name>fs.s3a.impl</name>
<value>org.apache.hadoop.fs.s3a.S3AFileSystem</value>
<description>The implementation class of the S3A Filesystem</description>
</property>

<property>
<name>fs.AbstractFileSystem.s3a.impl</name>
<value>org.apache.hadoop.fs.s3a.S3A</value>
<description>The implementation class of the S3A AbstractFileSystem.</description>
</property>

</configuration>

Note that you will need to replace KEY_HERE and SECRET_KEY_HERE with your actual S3 access keys. You can also set the appropriate environment variables with your keys. I put them in this file because I use multiple AWS profile using the configuration files, which is not picked up on by hadoop.

You can test access by using a public data set. For example, I tested with:

hdfs dfs -ls s3a://nasanex/NEX-DCP30

You should see the contents of that bucket, which includes 5 files.

Note the use of s3a in the protocol, this is the preferred provider over s3n and the deprecated s3.

In the next post, we’ll look at setting up google cloud storage in a similar manner.